Path of Exile 2: Mastering FilterBlade Usage
Quick Links
For anyone diving deep into Path of Exile 2's Endgame, setting up a suitable loot filter is essential. Loot filters help manage on-screen clutter, making your mapping experience more enjoyable and efficient by focusing only on the items that truly matter, thereby saving you from the mental strain of sorting through endless junk.
FilterBlade, renowned for its utility in Path of Exile 1, now also supports PoE 2 with its latest update. Here’s how you can leverage it for your gameplay.
How to Set Up FilterBlade Loot Filters in Path of Exile 2
- Navigate to the FilterBlade website.
- Choose PoE 2 when prompted.
- Select the default NeverSink loot filter, which will be pre-selected.
- Adjust the Strictness level using the provided slider (more details on strictness levels below).
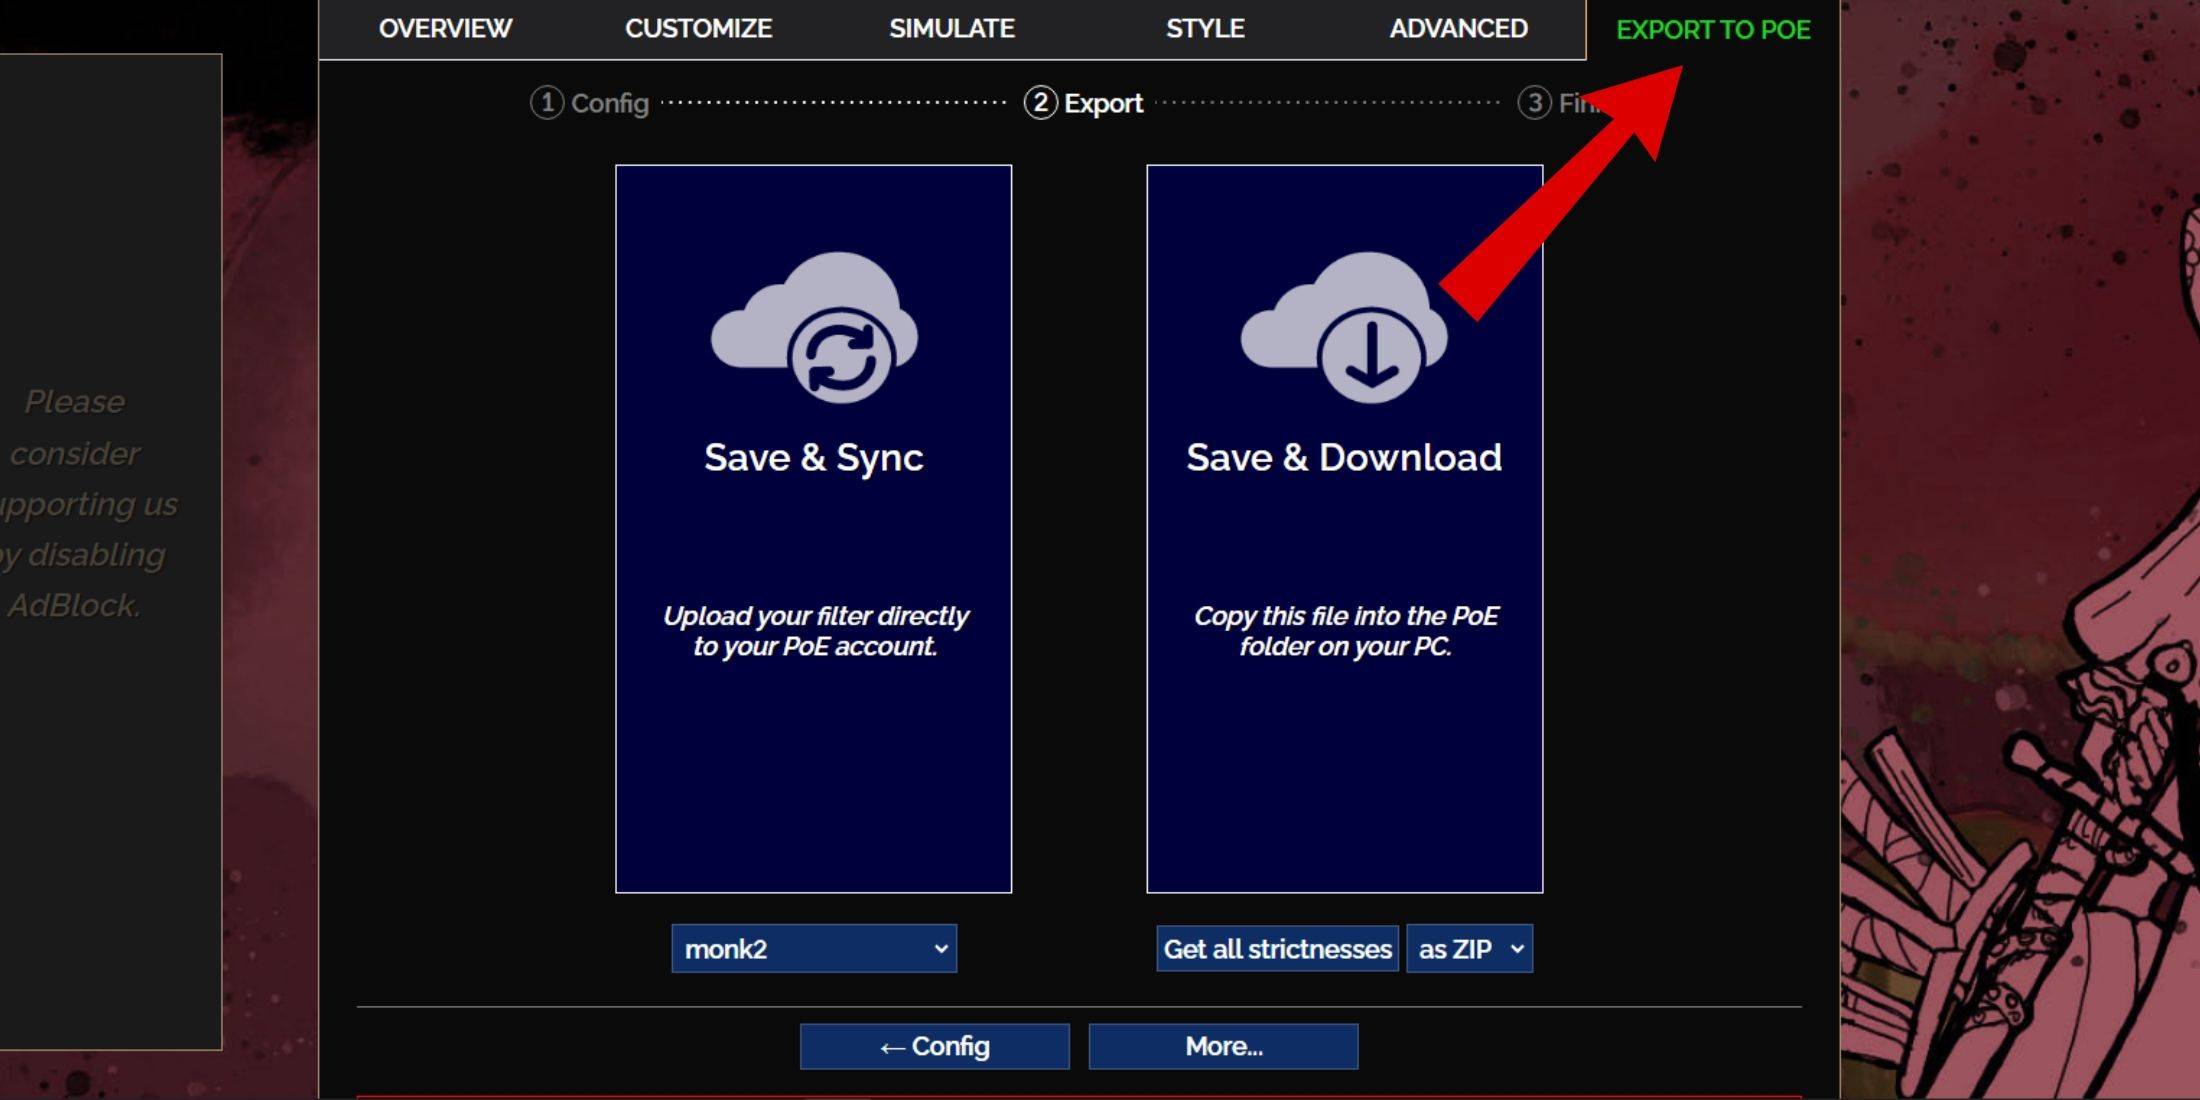
- Go to the Export to PoE tab located in the top right corner.
- Name your filter as desired.
- Choose between Sync or Download at the bottom right:
- Save & Sync will automatically update your PoE 2 account with the latest FilterBlade changes, ensuring you always have the most current filter settings.
- Save & Download allows you to save the filter file on your PC, which is handy for comparing different strictness levels without multiple syncs, especially useful at the start of a new campaign.
- Launch PoE 2 and access Options -> Game:
- If you opted for Sync, select the new FilterBlade filter from the Item Filter dropdown.
- If you chose Download, use the folder icon next to the dropdown to locate and apply your downloaded filters.
With these steps completed, your FilterBlade loot filter should now be active in your game.
Which Loot Filter Strictness Should You Choose?
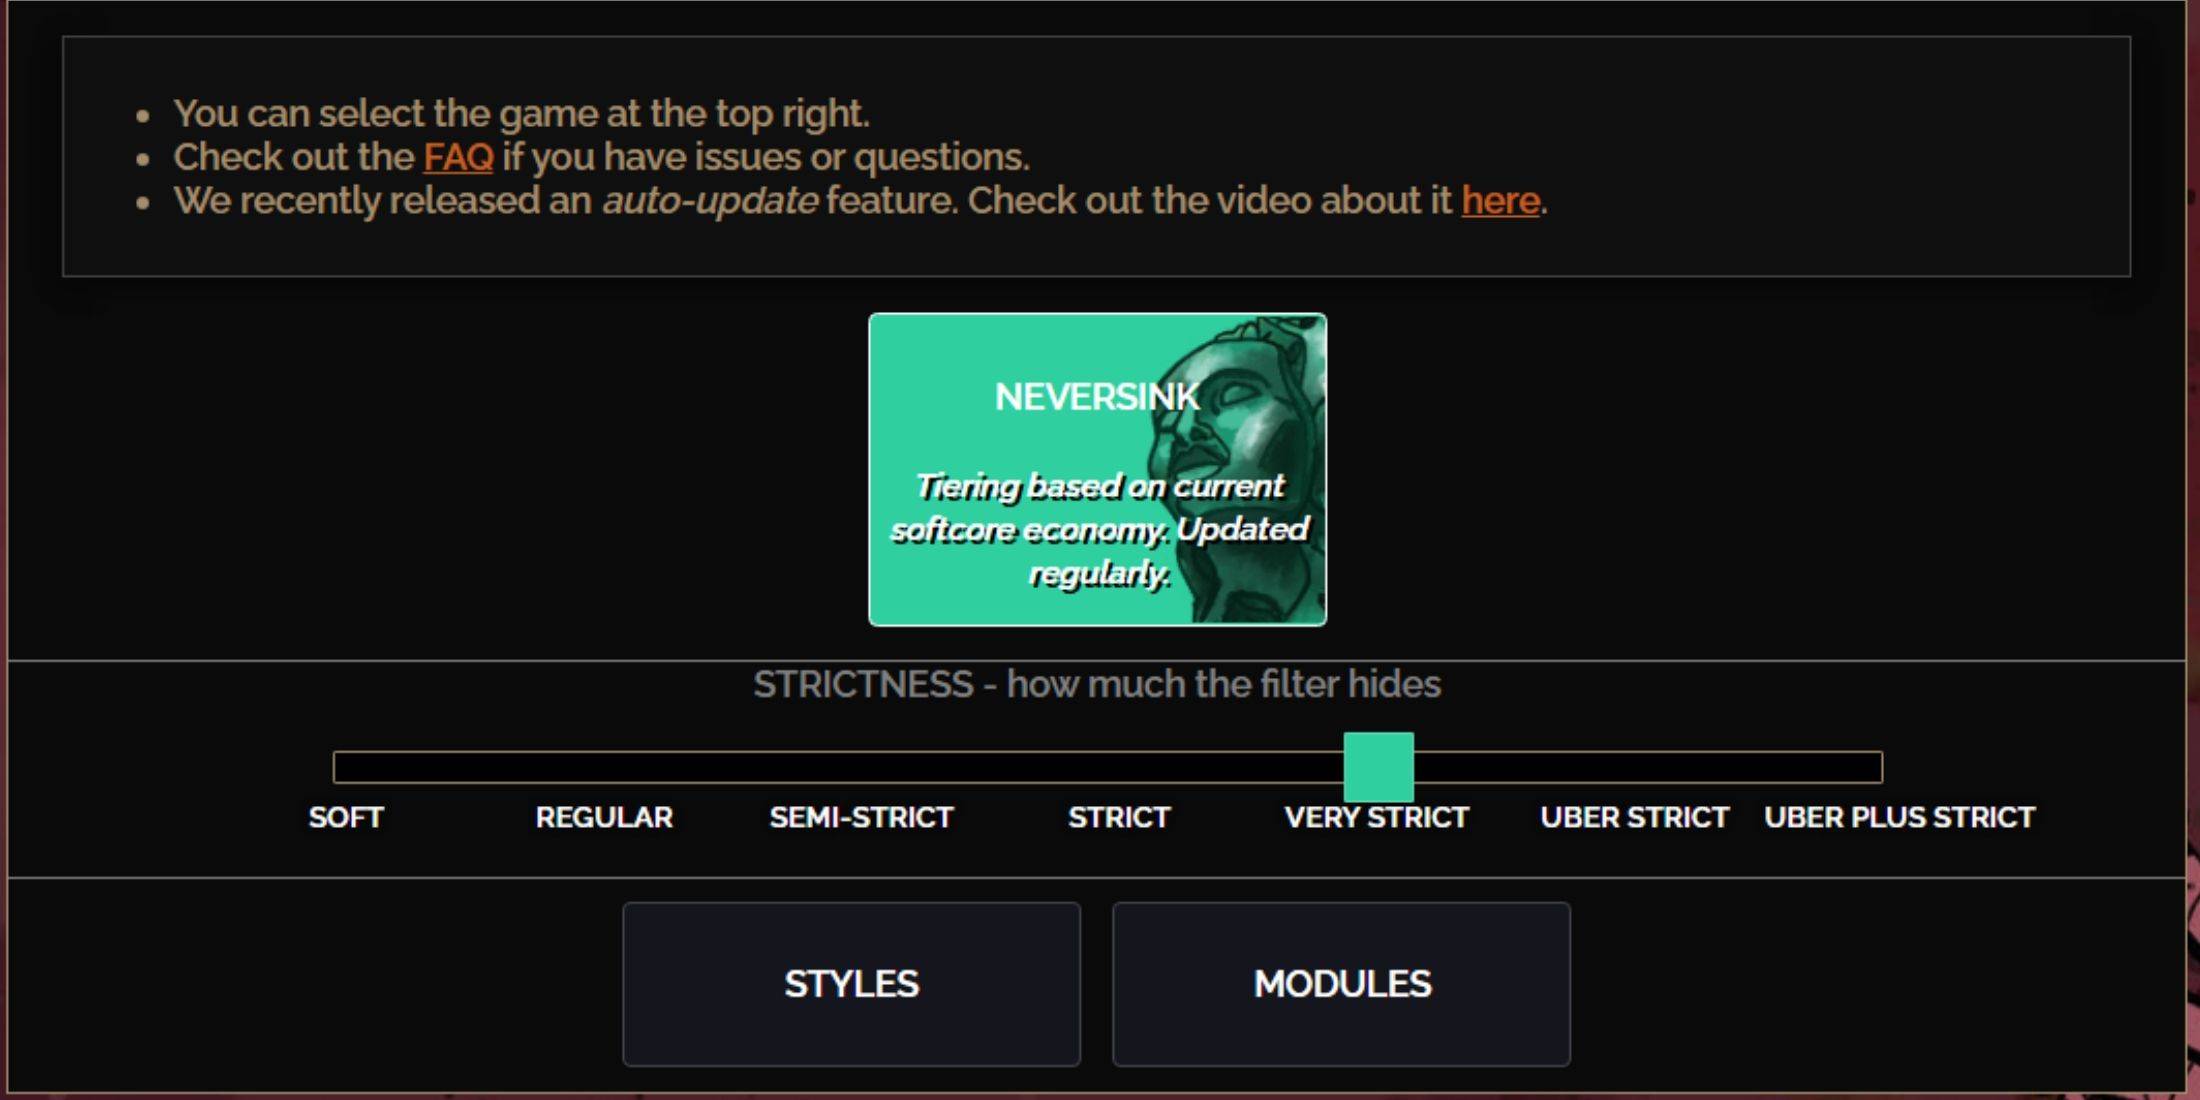
Choosing the right strictness level for the NeverSink FilterBlade preset is crucial as it determines what items you'll see during gameplay. Here's a breakdown of the available strictness levels and their best use cases:
| Strictness | Effect | Best For |
|---|---|---|
| Soft | Highlights valuable materials and items without hiding anything. | Act 1-2 |
| Regular | Hides only items with no crafting potential or sale value. | Act 3 |
| Semi-Strict | Hides items with low potential or limited value. | Act 4-6 |
| Strict | Hides most items without high turnover. | Early Mapping phase (Waystone Tier 1-6) |
| Very Strict | Hides low-value rare items and crafting bases, plus Waystone Tier 1-6. | Mid to late mapping phase (Waystone Tier 7+) |
| Uber Strict | Hides almost all non-tiered rare items and crafting bases, focusing on complete currency like Regal/Alchemy/Exalted/Chaos Orbs, no shards. Also hides Waystones Tier 1-13. | Late mapping phase (Waystone Tier 14+) |
| Uber Plus Strict | Hides almost everything except valuable currencies and high return rares and uniques, and Waystones Tiers 1-14. | Ultra endgame mapping phase (Waystone Tier 15-18) |
For players embarking on a second or third run through the campaign with a new character, starting with the Semi-Strict level is advisable. Soft and Regular strictness levels are better suited for brand new league runs, where every item is crucial for character progression, much like in a Solo Self-Found (SSF) run.
To quickly view items hidden by your loot filter, press the highlight key (ALT on PC). FilterBlade enhances this feature by adjusting the size of item names at different strictness levels, making it easier to pick up items without cluttering your screen.
How to Customize FilterBlade Loot Filter in PoE 2
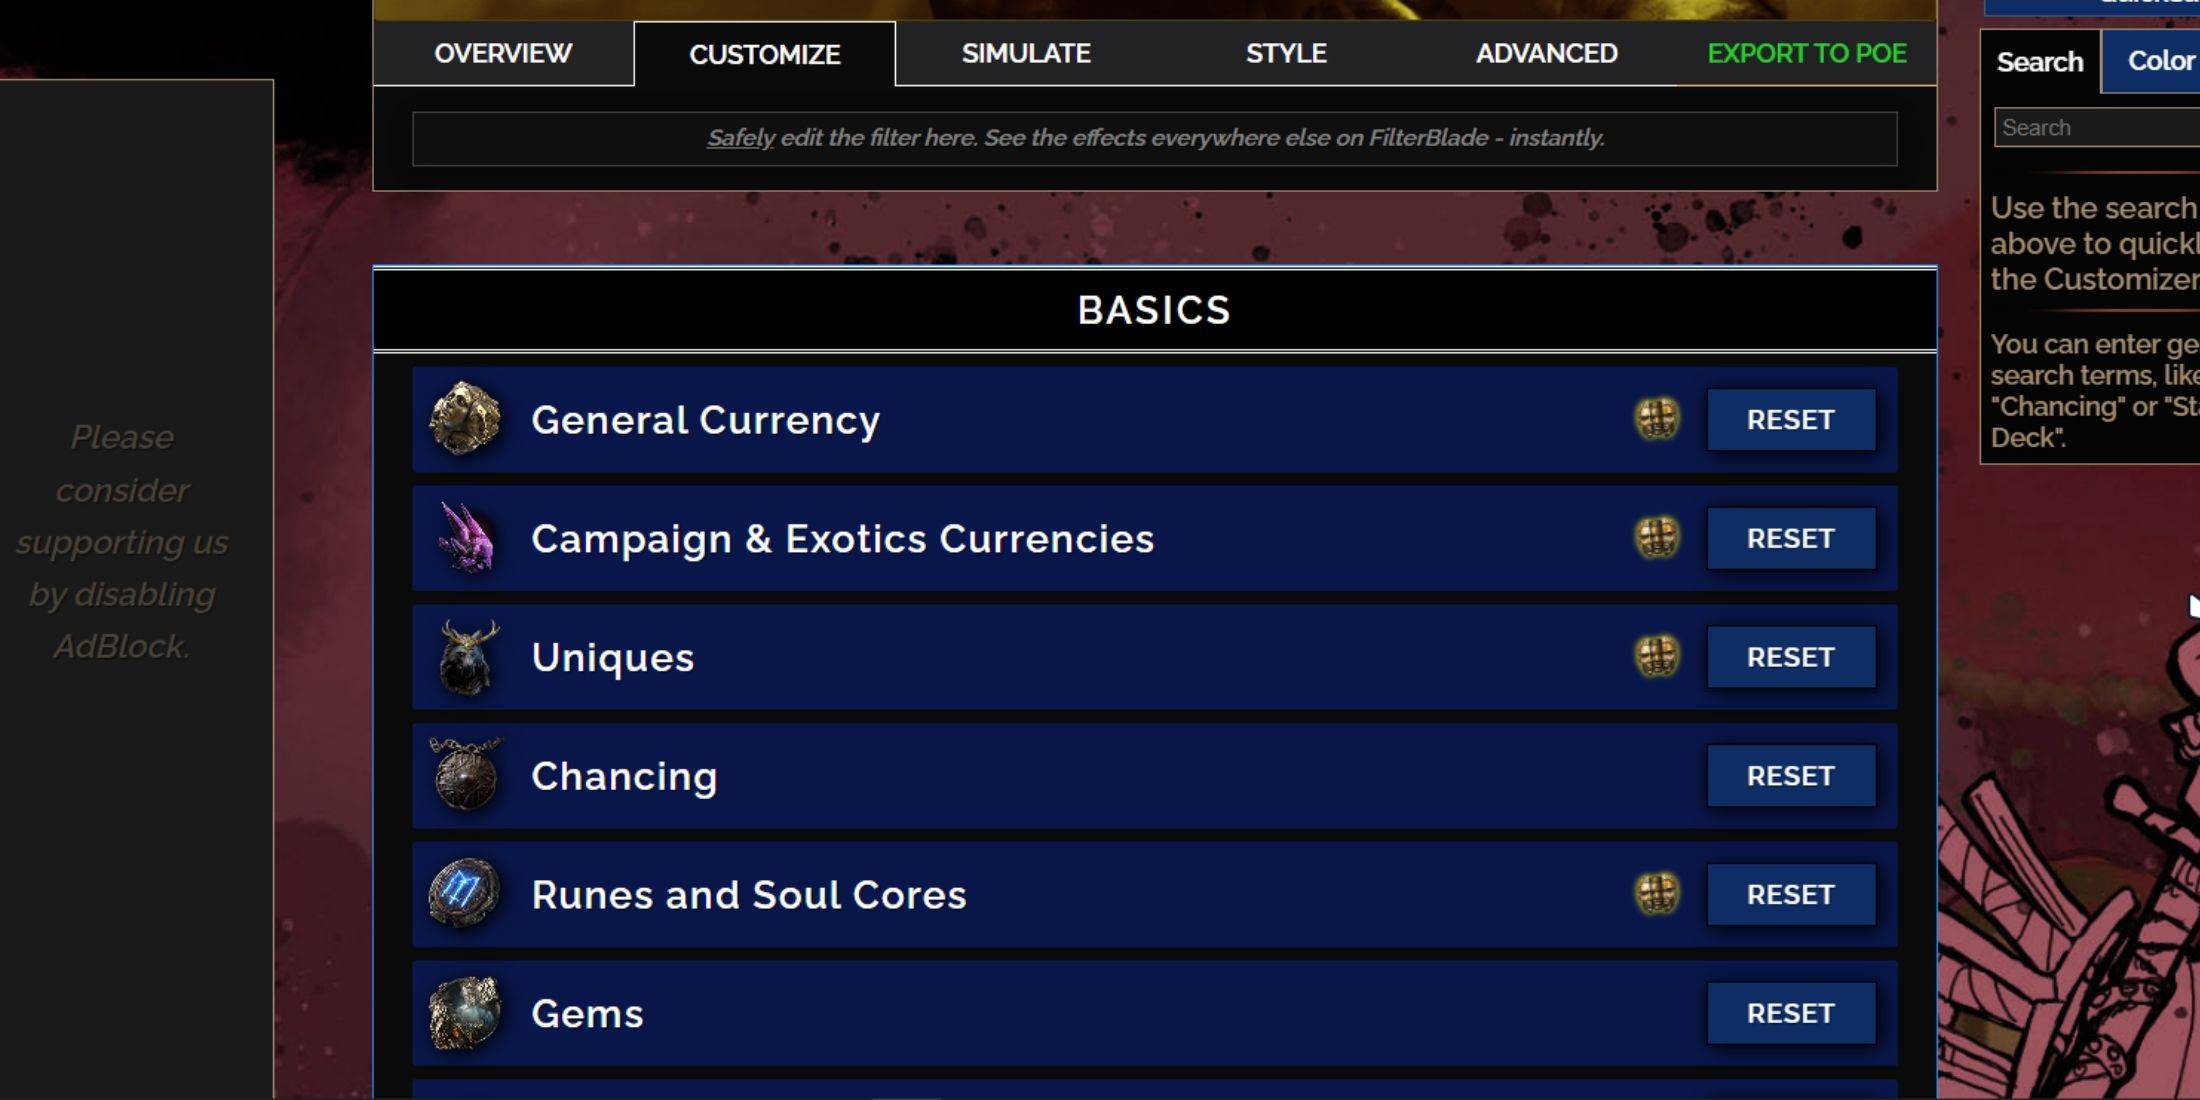
FilterBlade stands out due to its user-friendly customization options, allowing you to modify preset loot filters without delving into complex code.
How to Use the Customize Tab in FilterBlade
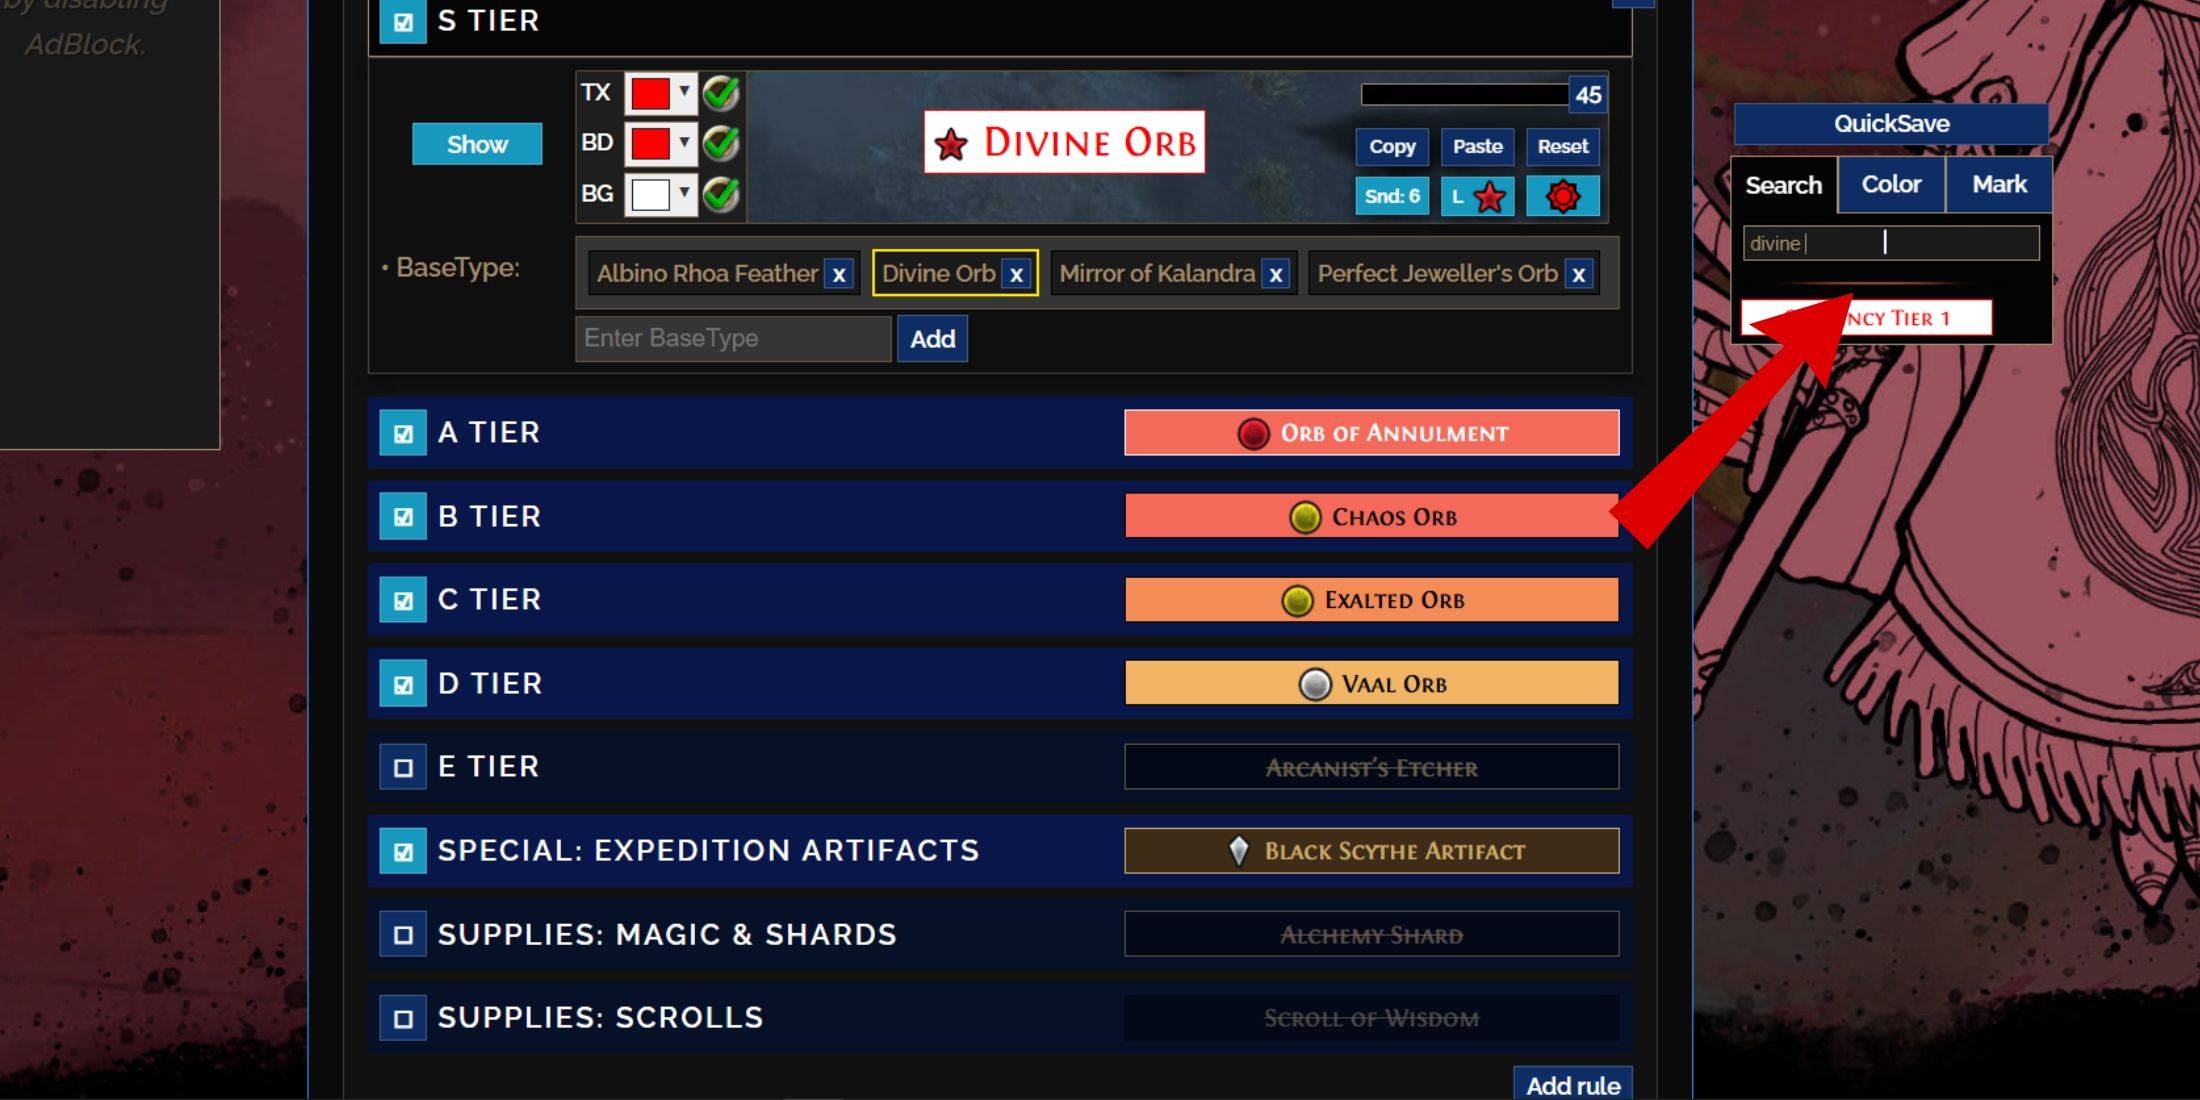
For detailed customization, navigate to the 'Customize' tab next to Overview. This tab organizes all possible drops in PoE 2 into sections and subsections, providing extensive customization options.
For instance, if you want to modify how a  Divine Orb looks when it drops, simply type "Divine Orb" into the search bar on the right. This will open the S Tier General Currency tab, displaying all possible changes you can make to the Divine Orb's appearance, with visual previews directly above.
To preview the sound of an item dropping in-game, click on the in-game showcase icon.
How to Change Colors and Sounds in FilterBlade
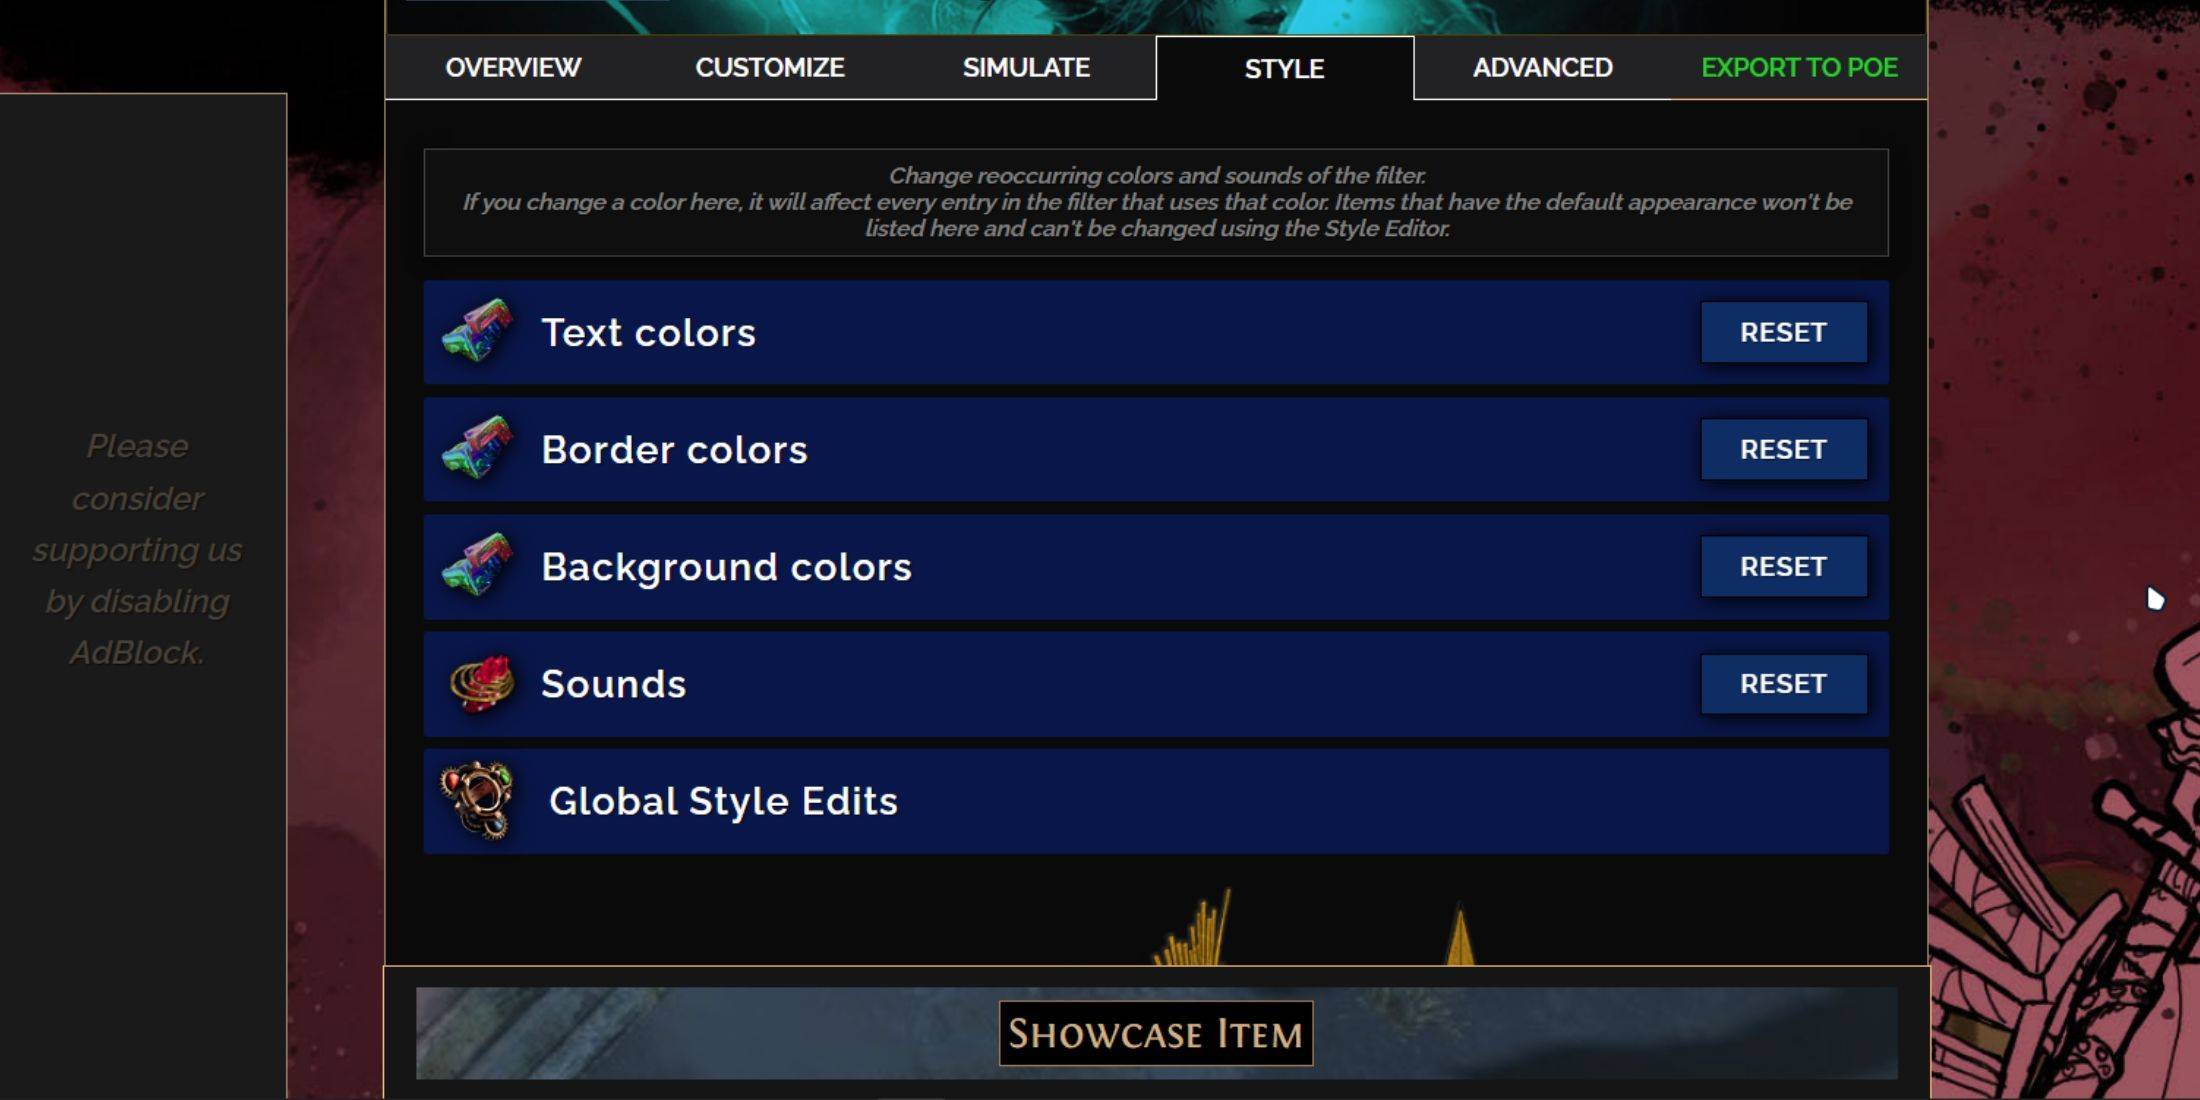
For individual or small group item modifications, use the 'Customize' tab. For broader, filter-wide changes, head to the 'Styles' tab. Here, you can alter the Text, Border, and Background of dropped items, as well as the audio cues for valuable drops.
Color changes are straightforward, with visual previews showing how items will appear in-game. To customize individual drops, return to the 'Customize' tab.
Sound effects can be modified using the dropdown menu. You can upload custom sounds (.mp3 format) by selecting 'Custom' or choose from community-added sounds under 'Game & Community Sounds'. Feel free to experiment; you can always revert changes by selecting 'Reset'.
For those new to loot filter customization, exploring public Modules can be a great start. These community-made presets offer visual or auditory alterations to your loot filter, making it easier to personalize your gameplay experience.
-
1
![Roblox Forsaken Characters Tier List [UPDATED] (2025)](https://imgs.ksjha.com/uploads/18/17380116246797f3e8a8a39.jpg)
Roblox Forsaken Characters Tier List [UPDATED] (2025)
Mar 17,2025
-
2
Roblox UGC Limited Codes Unveiled for January 2025
Jan 06,2025
-
3
Stardew Valley: A Complete Guide To Enchantments & Weapon Forging
Jan 07,2025
-
4
Pokémon TCG Pocket: Troubleshooting Error 102 Resolved
Jan 08,2025
-
5

Free Fire Characters 2025: Ultimate Guide
Feb 20,2025
-
6
Blood Strike - All Working Redeem Codes January 2025
Jan 08,2025
-
7

Blue Archive Unveils Cyber New Year March Event
Dec 19,2024
-
8
Roblox: RIVALS Codes (January 2025)
Jan 07,2025
-
9

Delta Force: A Complete Guide to All Campaign Missions
Apr 09,2025
-
10

Cyber Quest: Engage in Captivating Card Battles on Android
Dec 19,2024
-
Download

A Simple Life with My Unobtrusive Sister
Casual / 392.30M
Update: Mar 27,2025
-
Download

Random fap scene
Casual / 20.10M
Update: Dec 26,2024
-
Download
![Corrupting the Universe [v3.0]](https://imgs.ksjha.com/uploads/66/1719514653667db61d741e9.jpg)
Corrupting the Universe [v3.0]
Casual / 486.00M
Update: Dec 17,2024
-
4
Ben 10 A day with Gwen
-
5
Oniga Town of the Dead
-
6
A Wife And Mother
-
7
Cute Reapers in my Room Android
-
8
Permit Deny
-
9
Utouto Suyasuya
-
10
Roblox

